Battery switch on travel trailer function is crucial for managing your RV’s power. Understanding how this simple yet vital component works can save you headaches (and potentially a dead battery!). This guide breaks down the different types of switches, their functions, troubleshooting tips, and safety precautions, ensuring you’re well-equipped to handle any power situation on the road.
We’ll cover everything from identifying the various switch types—single-pole, double-pole, double-throw—and their pros and cons, to understanding how the switch isolates your house batteries from the chassis battery, preventing unwanted drain. We’ll also delve into troubleshooting common issues, safe usage practices, and the interaction between your battery switch and your charging system (converter, solar panels). Get ready to become a power management pro!
Function of the Battery Switch
The battery switch is a crucial component in your travel trailer’s electrical system, acting as the gatekeeper for your battery power. It allows you to control which battery bank (or banks) are providing power to your trailer’s appliances and systems, and importantly, to disconnect your batteries entirely to prevent unwanted drain.Understanding how this switch works is key to maintaining your trailer’s battery life and avoiding unexpected dead batteries.
Proper use of the battery switch ensures that you’ll always have power when you need it and protects your investment.
Battery Isolation
The primary function of the battery switch is to isolate the house batteries (used to power your trailer’s interior lights, appliances, and other systems) from the chassis battery (which powers the trailer’s brakes and other essential functions). This isolation is critical because a faulty appliance or a parasitic drain in the house battery system won’t drain your chassis battery, preventing you from being stranded.
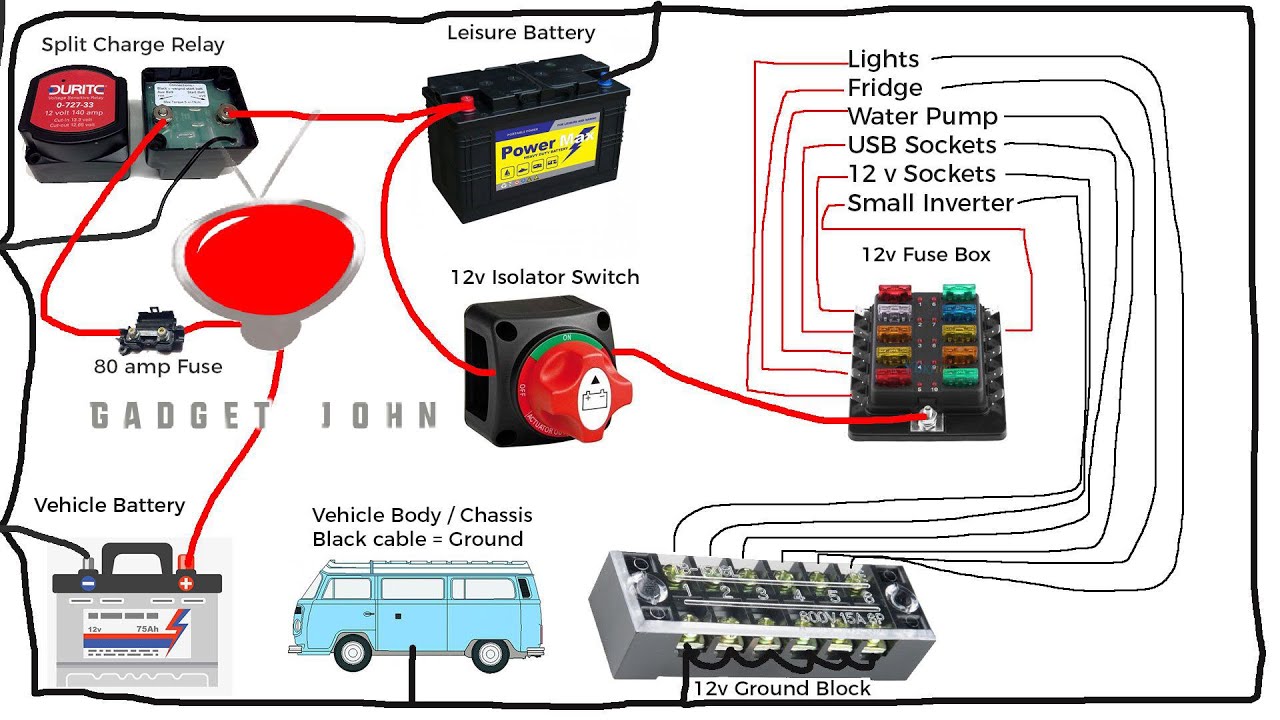
A typical switch will have positions for “Both,” “House,” “Off,” and “Chassis” or similar designations, allowing you to select which battery bank, or neither, is active.
Preventing Battery Drain
When your travel trailer is not in use for an extended period, turning the battery switch to the “Off” position completely disconnects both the house and chassis batteries from each other and from the trailer’s electrical system. This prevents any potential drain from things like low-level current draws from alarm systems, interior lights, or even faulty wiring. This simple act can significantly extend the life of your batteries and prevent the frustration of arriving at your campsite only to find a dead battery.
Operating the Battery Switch
Correctly using the battery switch is straightforward but crucial. First, locate the switch, typically found near your battery compartment. Next, understand the positions on your switch. They may vary slightly depending on the manufacturer, but generally, they will include:
- Off: This position completely disconnects both battery banks from the trailer’s electrical system.
- House: This position connects only the house batteries to the trailer’s system.
- Chassis: This position connects only the chassis battery to the trailer’s system (often used for starting the trailer’s engine or other chassis-related functions).
- Both: This position connects both the house and chassis batteries to the trailer’s system, providing maximum power.
To switch between battery banks, simply turn the switch to the desired position. Always ensure the switch is in the “Off” position when storing the trailer for any length of time. Regularly checking your battery levels is also recommended to ensure your batteries are in good working order.
Troubleshooting Common Battery Switch Issues: Battery Switch On Travel Trailer Function
So, your travel trailer’s battery isn’t cooperating? Before you start tearing things apart, let’s systematically troubleshoot your battery switch. It’s a common culprit for electrical gremlins in RVs, and often a simple fix. This section will guide you through identifying and resolving common problems.It’s important to remember safety first when working with electrical systems. Always disconnect the negative battery cable before starting any work.
Identifying Common Battery Switch Problems
Several issues can plague your battery switch, leading to a frustrating lack of power. These range from simple, easily-fixed problems to more significant switch failures. The most frequent culprits are corrosion, loose connections, and, of course, switch failure itself. Corrosion builds up on terminals, creating resistance and preventing proper current flow. Loose connections can vibrate loose over time, leading to intermittent power or complete failure.
So, you’re an audiophile who travels? Awesome! Check out this guide on creating the perfect audiophile travel setup to ensure your sonic adventures never stop. Remember to protect yourself while you’re exploring new sounds and sights by getting solid travel insurance; I highly recommend looking into Aon travel insurance for comprehensive coverage. That way, you can focus on enjoying your trip and your music without worrying about unexpected costs.
A faulty switch itself might be internally damaged or simply worn out from years of use.
Diagnosing a Malfunctioning Battery Switch
Diagnosing the problem involves a series of checks. First, visually inspect the switch and its connections. Look for any signs of corrosion—a white, green, or blue powdery substance on the terminals or wires. Tighten any loose connections you find. If you see corrosion, carefully clean the terminals with a wire brush and baking soda paste.
After cleaning, apply a corrosion inhibitor to prevent future build-up.Next, check the fuses associated with the battery switch. A blown fuse can mimic a faulty switch. Replace any blown fuses with fuses of the correct amperage rating.If the visual inspection and fuse check don’t reveal the problem, it’s time to test the switch itself.
Safely Testing the Battery Switch with a Multimeter
A multimeter is your best friend here. First, ensure your multimeter is set to measure DC voltage. With the battery switch in the “off” position, measure the voltage across the terminals of the switch. You should read near zero volts. If you read a significant voltage, there’s a problem with the switch or its internal wiring.Next, turn the battery switch to the “on” position.
Measure the voltage again across the switch terminals. You should now read a voltage close to the battery’s voltage. A significant difference between the “off” and “on” readings indicates a potentially faulty switch. If the voltage reading is still near zero in the “on” position, this indicates a problem with the switch itself or the wiring to the battery.
So, you’re an audiophile who travels? Awesome! Make sure you check out this guide on audiophile travel setups to keep your tunes sounding great on the go. And while you’re planning your trip, don’t forget about travel insurance! Getting Aon travel insurance is a smart move for peace of mind, covering unexpected issues and letting you focus on enjoying your adventures and amazing sound.
Remember to always disconnect the negative battery cable before performing any tests.
Preventative Maintenance for Extended Battery Switch Lifespan
Regular maintenance can significantly extend the life of your battery switch. Regularly inspect the switch and its connections for corrosion and loose connections. Clean the terminals at least once a year, or more often if you live in a humid climate. Applying a dielectric grease to the terminals after cleaning helps prevent corrosion. This simple step can save you a lot of headaches (and potential costly repairs) down the road.
Also, be mindful of the switch’s operational limits; don’t exceed the current rating specified by the manufacturer.
Battery Switch and Charging Systems
Your travel trailer’s battery switch is more than just an on/off switch; it’s a crucial component that interacts directly with your charging system, influencing how power flows to and from your batteries. Understanding this interaction is key to maximizing battery life and preventing damage to your charging equipment. This section details how the battery switch affects charging from various sources.The battery switch acts as a gatekeeper, controlling the flow of electricity to and from your batteries.
When the switch is in the “on” position, it allows your charging system (converter, solar panels, or generator) to charge your batteries and also allows you to draw power from your batteries to run your trailer’s appliances. Conversely, when the switch is “off,” it isolates the batteries, preventing both charging and discharge. This is important for safety and preventing accidental battery drain.
Battery Switch and Charging System Interaction
The relationship between the battery switch and your charging system is straightforward but vital. Your converter (typically plugged into shore power) sends power to the batteries only when the battery switch is on. Similarly, solar panels will only charge your batteries when the switch is enabled, directing their output to the designated battery bank. If the switch is off, neither the converter nor the solar panels can charge the batteries, regardless of their operational status.
A generator’s output, likewise, relies on the switch to direct charging power to the batteries. In essence, the battery switch acts as a master control for all charging processes.
Charging Multiple Battery Banks
Many RVs have multiple battery banks (e.g., one for house use, one for starting the vehicle). A battery switch, especially a multi-bank switch, allows for independent control over the charging and discharging of each bank. This means you can charge one bank while leaving the other isolated, or you can connect both banks for simultaneous charging or use. Incorrect switch settings can lead to issues like overcharging one bank while another remains depleted, or inadvertently draining a fully charged bank to power appliances.
Power Flow Through the Battery Switch and Charging System, Battery switch on travel trailer function
The following flowchart depicts a typical power flow scenario:Shore Power/Generator/Solar Panels –> [Battery Switch (ON/OFF)] –> Battery Bank(s) –> Trailer Appliances/LoadsIn this simplified representation, the battery switch controls the flow from the charging source to the batteries, and from the batteries to the appliances. When the switch is OFF, the flow is interrupted. A more complex system might include a charge controller for solar panels and a battery management system for more sophisticated control, but the fundamental role of the battery switch remains the same.
Potential Problems from Incorrect Battery Switch Usage During Charging
Incorrect usage of the battery switch during charging can lead to several problems:
- Overcharging: If a battery bank is left connected to a charger while the switch is in the “on” position and the bank is already fully charged, it could lead to overcharging, damaging the batteries.
- Undercharging: If the switch is inadvertently turned off while a bank is being charged, it interrupts the charging process and leaves the battery undercharged.
- Battery Drain: Leaving the switch on when not using the trailer can drain the batteries, especially if there’s a parasitic draw (a small, constant drain from devices left on).
- Charging System Damage: In some cases, incorrect switch usage might overload the charging system, potentially causing damage to the converter or other components.
- Incorrect Bank Charging: In systems with multiple banks, an incorrect switch position might prevent a specific bank from charging while others charge correctly.
Safety Considerations with Battery Switches

Working with your travel trailer’s battery system, including the battery switch, requires caution. Improper handling can lead to serious injury or damage to your equipment. Always prioritize safety when performing any tasks related to your RV’s electrical system.Batteries contain corrosive chemicals and store significant electrical energy. A discharged battery still retains a dangerous charge, and even a seemingly “dead” battery can deliver a painful shock.
Furthermore, the fumes produced by batteries, particularly during charging or if damaged, can be explosive. Understanding these risks is crucial to working safely.
Battery Switch Disconnection Procedure
Before performing any maintenance or repairs on your battery switch or related components, it’s essential to disconnect the battery switch properly. This prevents accidental shorts and protects you from electrical hazards. First, turn off all appliances and electronics connected to the battery system. Next, locate the battery switch – it’s usually clearly labeled and easily accessible. Then, firmly move the switch to the “OFF” position.
This will interrupt the power flow from the battery to the trailer’s electrical system. Finally, for added safety, especially if you’re working directly on the switch itself, disconnect the negative (-) cable from the battery using a wrench. Remember to always disconnect the negative cable first, and reconnect the positive cable last. This minimizes the risk of accidental short circuits.
Potential Hazards of Battery Switch Malfunction
A malfunctioning battery switch can present several hazards. A switch that fails in the “ON” position could drain your battery completely, leaving you stranded. Conversely, a switch stuck in the “OFF” position will prevent you from using any 12-volt appliances in your trailer. More serious hazards include sparking or arcing within the switch itself, potentially igniting flammable materials nearby.
This risk is heightened if the switch is damaged or corroded. Finally, a poorly maintained switch could overheat, leading to a fire hazard. Regular inspection and proper maintenance are key to preventing these issues.
Safety Precautions When Working with Battery Switches
Several safety precautions should always be followed when working with your travel trailer’s battery switch. Always wear appropriate safety glasses to protect your eyes from sparks or splashes of battery acid. Wear gloves to protect your hands from corrosion and potential chemical burns. Never work alone; have someone nearby to assist in case of an emergency. Ensure good ventilation when working around batteries, as the fumes can be hazardous.
If you’re unsure about any aspect of the process, consult a qualified RV technician. Remember, safety is paramount.
Mastering your travel trailer’s battery switch is key to a smooth and enjoyable RV experience. By understanding its function, performing regular maintenance, and knowing how to troubleshoot problems, you’ll prevent costly repairs and ensure your power systems remain reliable. Remember, safety is paramount – always disconnect the battery before working on the switch. Happy travels!
Q&A
What happens if my battery switch is faulty?
A faulty switch can lead to dead batteries, inability to charge, or even electrical shorts. Symptoms include no power to appliances, slow charging, or a constantly draining battery.
How often should I check my battery switch?
Inspect your battery switch at least once a year, or more frequently if you notice any problems. Check for corrosion, loose connections, and ensure the switch operates smoothly.
Can I use a multimeter to test my battery switch?
Yes, a multimeter can test for continuity and voltage to diagnose problems. Consult an online guide or a qualified technician for instructions on how to do this safely.
What type of battery switch is best for my travel trailer?
The best type depends on your specific needs and setup (single or dual batteries). A qualified RV technician can advise on the most appropriate switch for your system.
